
While setting up this blog with Jekyll, I went through quite a process to get everything configured so that I could host it on S3 with CloudFront. I wrote this article to document the process in hopes that it might help others (and maybe the next time I need to do this.)
When I first started, I assumed this would be a fairly well documented process. I did find a number of articles on this topic, but many were outdated or didn’t provide all the steps I needed.
My requirements were:
- Static Jekyll site
- Hosted in an AWS S3 bucket
- Content delivery via AWS Cloudfront
- Custom domain registered with namecheap.com
- Source control with Github
- Automatic publication via Github Actions
Here are the steps necessary to get this set up:
Creating the S3 Bucket
To get started, create your S3 bucket. There are two very important settings you must apply when creating the bucket. First, ensure that all of the “Block public access” settings are disabled:
 S3 Block Public Access
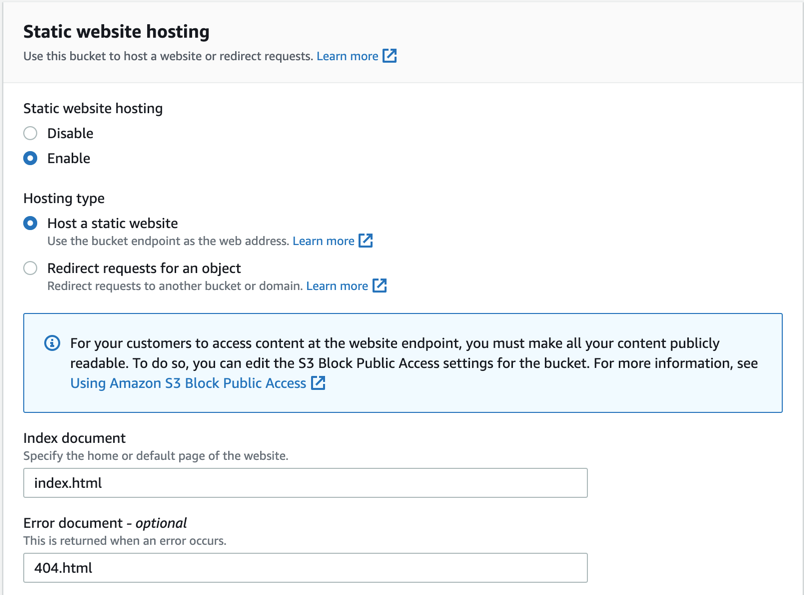
Next, ensure that you have the “Static website hosting” setting “Enabled”. Also, specify index.html as the “Index document” and 404.html as the “Error document”.
 S3 Static Hosting Configuration
After the bucket is created with the above settings, create a simple index.html file and use the “Objects” tab to upload it to your bucket.
1
2
3
4
5
<html>
  <body>
    <h1>Hello World!</h1>
  </body>
</html>
You should now be able to access the file using the URL shown on the “Static website hosting” configuration. It will look something like this:
http://<bucket-name>.s3-website-<aws-region>.amazonaws.com/
Make sure you see the “Hello World!” message from your HTML file before continuing to the next step.
Configuring CloudFront
Next, setup a CloudFront distribution to point to your S3 bucket. We’ll first get the distribution setup and tested, then come back and add the custom domain name.
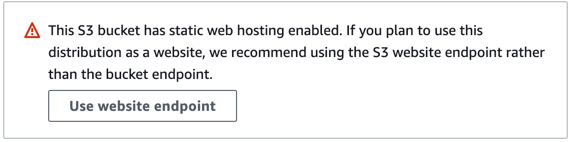
When configuring the “Origin domain”, select the S3 bucket you just created. When you do so, you may see a warning message indicating that “This S3 bucket has static web hosting enabled”. If so, click the “Use website endpoint” button.
 Cloudfront S3 Static Web Warning
Even if you don’t get the warning, ensure the “Origin domain” is the same as the host in the url used above to test the bucket:
<bucket-name>.s3-website-<aws-region>.amazonaws.com
Next, make sure the following settings are configured:
| Origin access | Public |
| Viewer protocol policy | HTTP and HTTPS |
| Allowed HTTP methods | GET, HEAD |
| Restrict viewer access | No |
| Default root object | index.html |
Everything else can remain the default setting.
Once the distribution is created and deployed, you should be able to access the HTML in the S3 bucket by using the distribution’s URL. In the “Details” section there is a “Distribution domain name”. Use this domain name in your browser to test it out. It should look something like:
https://<distribution-id>.cloudfront.net
Make sure you see the “Hello World!” message from your HTML file before continuing to the next step.
Configuring a Custom Domain Name
Next, we’ll use AWS Certificate Manager to create an SSL certificate and configure your domain to point to the CloudFront distribution. This assumes that you’ve already secured a domain name through your registrar. For example, I use namecheap.com as my domain registrar.
Navigate to AWS Certificate Manager (ACM) and request a new certificate. Enter the domain name and select “DNS validation” for the “Validation method”. After you request the certificate, it is in a “pending” state until validated.
You may see in the help text prompting you to configure both the “www” and raw domain names. For example both
www.predicatemethod.comandpredicatemethod.com. However, if you intend to only use the “raw” domain, I would recommend configuring your DNS to simply forward the “www” host instead of pointing both domains to your website.
To complete the validation, you’ll need to update the DNS settings with your domain registrar by adding the AWS supplied values as a CNAME entry. This will vary based on your registrar, but here is an example on how to accomplish this with NameCheap.
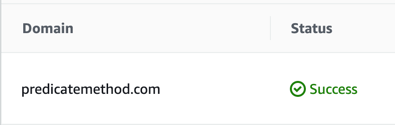
Basically the AWS “CNAME name” is used as the DNS “host” name and the AWS “CNAME value” is used as the DNS “value”. Once this is updated, this could take some time for the change to propagate and for AWS to recognize the change. When this does complete, a “Success” status will be shown in ACM.
 ACM Success Status
Updating the SSL Certificate in CloudFront
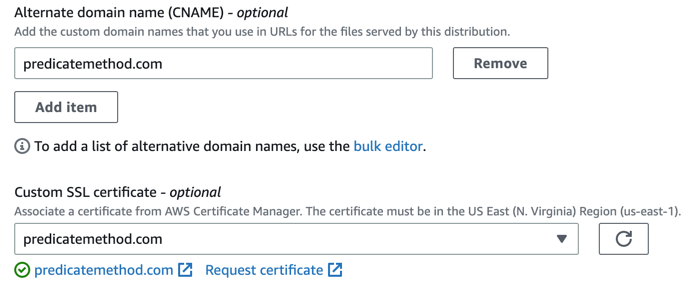
Now we can update CloudFront with our new certificate configuration. Navigate to the AWS distribution created above and click the “Edit” button under the “Settings” section. In the “Alternate domain name (CNAME)” section add your domain name. Then under “Custom SSL certificate” you should be able to select your newly created certificate from the drop-down.
 CloudFront Domain Name
Also under the “Behaviors” tab, edit the default behavior and change the “Viewer protocol policy” to “Redirect HTTP to HTTPS”.
Again, after the settings have been changed and deployed, verify you can see the HTML page by navigating to your custom domain in the browser.
At this point you should have everything configured in AWS to serve a website through S3 and CloudFront. Next, if you’re using Jekyll as a static site generator, we’ll configure Github to build and deploy the site to AWS.
Setting up Permissions for Github Actions
In order for Github to be allowed to push changes to S3 and invalidate the CloudFront cache we need to supply credentials. Back in the AWS console, navigate to the Identity and Access Management (IAM) tool. Create a new user and also create an “Access key” for this user. Save off the access key ID and secret. We’ll need these later.
In IAM when viewing this new user, click on the “Permissions” tab and create a new policy. We need to give this user the ability to invalidate the CloudFront distribution. You can use the visual editor or create the JSON directly. The end result should look something like the example below, but be sure to replace the appropriate values in the example.
1
2
3
4
5
6
7
8
9
10
11
{
  "Version": "2012-10-17",
  "Statement": [
    {
      "Sid": "VisualEditor0",
      "Effect": "Allow",
      "Action": "cloudfront:CreateInvalidation",
      "Resource": "arn:aws:cloudfront::<account-id>:distribution/<distribution-id>"
    }
  ]
}
Now, we need to allow this user to place files in the S3 bucket. In AWS, navigate to your bucket under the “Permissions” tab and edit the “Bucket policy”. Since the bucket is public, there should already be one statement in the array. You’ll need to add a new “Statement” for this new user. The end result should look something like the example below. Again, replace the appropriate values. Notice that we only list the minimum permissions necessary for the user to update the site in the bucket in the “Action” array.
1
2
3
4
5
6
7
8
9
10
11
12
13
14
15
16
17
18
19
20
21
22
23
24
25
26
27
28
29
30
{
    "Version": "2008-10-17",
    "Id": "PolicyForCloudFrontPrivateContent",
    "Statement": [
        {
            "Sid": "AllowJekyllGithubAction",
            "Effect": "Allow",
            "Principal": {
                "AWS": "arn:aws:iam::<account-id>:user/<user-id>"
            },
            "Action": [
                "s3:PutObject",
                "s3:GetObject",
                "s3:ListBucket",
                "s3:DeleteObject"
            ],
            "Resource": [
                "arn:aws:s3:::<bucket-name>",
                "arn:aws:s3:::<bucket-name>/*"
            ]
        },
        {
            "Sid": "PublicReadGetObject",
            "Effect": "Allow",
            "Principal": "*",
            "Action": "s3:GetObject",
            "Resource": "arn:aws:s3:::<bucket-name>/*"
        }
    ]
}
Configuring Github Actions for Deployment
This should conclude all the changes necessary for AWS. Next, we need to move over to Github and setup the repository.
In your repo, navigate to “Settings”, “Secrets and variables” then “Actions”. Add four new secrets named AWS_ACCESS_KEY_ID, AWS_CLOUDFRONT_DISTRIBUTION_ID, AWS_S3_BUCKET_NAME, and AWS_SECRET_ACCESS_KEY with their corresponding values.
 Github Secrets Example
Next, add the following file to the .github/workflows folder in your repository.
1
2
3
4
5
6
7
8
9
10
11
12
13
14
15
16
17
18
19
20
21
22
23
24
25
26
27
28
29
30
31
32
33
34
35
36
37
# .github/workflows/build-and-deploy-to-s3.yml
#
name: Build and Deploy to S3

# Controls when the action will run.
on:
  # Triggers the workflow on push for the master or main branch
  push:
    branches: [ master, main ]

  # Allows you to run this workflow manually from the Actions tab
  workflow_dispatch:

env:
  AWS_ACCESS_KEY_ID: ${{ secrets.AWS_ACCESS_KEY_ID }}
  AWS_SECRET_ACCESS_KEY: ${{ secrets.AWS_SECRET_ACCESS_KEY }}
  AWS_DEFAULT_REGION: 'us-east-1'

# A workflow run is made up of one or more jobs that can run sequentially or in parallel
jobs:
  build:
    runs-on: ubuntu-latest
    steps:
      - uses: actions/checkout@v2
      - name: Set up Ruby
        uses: ruby/setup-ruby@v1
        with:
          ruby-version: "3.0" # Not needed with a .ruby-version file
          bundler-cache: true
      - name: "Build Site"
        run: bundle exec jekyll build
        env:
          JEKYLL_ENV: production
      - name: "Deploy to AWS S3"
        run: aws s3 sync ./_site/ s3://${{ secrets.AWS_S3_BUCKET_NAME }} --delete --cache-control max-age=604800
      - name: "Create AWS Cloudfront Invalidation"
        run: aws cloudfront create-invalidation --distribution-id ${{ secrets.AWS_CLOUDFRONT_DISTRIBUTION_ID }} --paths "/*"
Now, commit and push the new file to the repository. Under the “Actions” tab in Github you should see this new workflow trigger and attempt to push the site to S3 and invalidate the CloudFront cache. When that completes, visit your custom domain in the browser. If all was successful, you should see your Jekyll static site!
Going forward, any changes you push will automatically trigger the workflow updating the site.
Resources
Here are a couple other articles that were helpful in getting this setup: